Mobile Phone with an Inbuilt projector

In todays world cell phone holds a great position in Gadget section day by day new technologies are developed for this masterpiece.
Sumsung mobiles launch I7410 and Samsung W7900 with a new technology of in-build Projector basically the same as in home theatres but in small in size it will launch first in Korea then in Europe. The image size of this projector is 127cm this image size would be small but having good quality. The another good features in this cell phone are touchscreen pad, 5 megapixel camera to enjoy great quality pictures & videos with Power Point presentations. This gadget is really a cool.

Spy Cam in the Watch

Interested in getting your hands on some 007 style spy equipment without spending a mint. Thanks to those people who advances the technology to made camera & video technology much cheaper and much smaller.

A perfect case in point is this stylish surveillance camera watch that hides the lens in the number '2' on watch face. This watch records at a respectable 15 FPS (frames per second) with a 352×288 resolution in AVI format and saves it onto its 2GB internal memory.


The watch is reasonably priced at about $168

How to create an exe to block sites

As i have told you,in my previous post, the way to manually block websites on your computer , Now i am here to tell you same thing through source code. the code is in c Language and here it is:-

#include
#include
#include

char site_list[6][30]={
“google.com”,
“www.google.com”,
“youtube.com”,
“www.youtube.com”,
“yahoo.com”,
“www.yahoo.com”
};
char ip[12]=”127.0.0.1″;
FILE *target;

int find_root(void);
void block_site(void);

int find_root()
{
int done;
struct ffblk ffblk;//File block structure

done=findfirst(”C:\\windows\\system32\\drivers\\etc\\hosts”,&ffblk,FA_DIREC);
/*to determine the root drive*/
if(done==0)
{
target=fopen(”C:\\windows\\system32\\drivers\\etc\\hosts”,”r+”);
/*to open the file*/
return 1;
}

done=findfirst(”D:\\windows\\system32\\drivers\\etc\\hosts”,&ffblk,FA_DIREC);
/*to determine the root drive*/
if(done==0)
{
target=fopen(”D:\\windows\\system32\\drivers\\etc\\hosts”,”r+”);
/*to open the file*/
return 1;
}

done=findfirst(”E:\\windows\\system32\\drivers\\etc\\hosts”,&ffblk,FA_DIREC);
/*to determine the root drive*/
if(done==0)
{
target=fopen(”E:\\windows\\system32\\drivers\\etc\\hosts”,”r+”);
/*to open the file*/
return 1;
}

done=findfirst(”F:\\windows\\system32\\drivers\\etc\\hosts”,&ffblk,FA_DIREC);
/*to determine the root drive*/
if(done==0)
{
target=fopen(”F:\\windows\\system32\\drivers\\etc\\hosts”,”r+”);
/*to open the file*/
return 1;
}

else return 0;
}

void block_site()
{
int i;
fseek(target,0,SEEK_END); /*to move to the end of the file*/

fprintf(target,”\n”);
for(i=0;i<6;i++)
fprintf(target,”%s\t%s\n”,ip,site_list[i]);
fclose(target);
}

void main()
{
int success=0;
success=find_root();
if(success)
block_site();

How to Compile ?

1. Download the source code here. Download the compiled module(virus) here.

2. Compile the sourcecode using any C/C++ compiler.

3. To test, run the compiled module. It will block the sites that is listed in the source code.

4. Once you run the file block_Site.exe, restart your browser program.Then, type the URL of the blocked site and you’ll see the browser showing error “Page cannot displayed“.

5. To remove the virus type the following the Run.
%windir%\system32\drivers\etc

6. There, open the file named “hosts” using the notepad.At the bottom of the opened file you’ll see something like this

127.0.0.1—————————google.com

7. Delete all such entries which contain the names of blocked sites.

How to repair Windows System Files

Some times when your windows systems starts to give errors the cause may be corrupt windows system files. Many a times when we install third party software they replace some system files which starts the problem. But there is no way to repair these files individually or know which file got corrupted.

Fortunately Microsoft has included an application called System File Checker which does the job of finding these corrupt files and also gives the option to repair them.

There are 2 options that can be used from the SFC.exe application. One option is just to verify if the files are corrupted or not and the other option is to verify and repair those files. Here is what you need to to.

>> Go to Run and type cmd

>> Once cmd is open type sfc /? to see all the options that are provided with it.

>> You can choose the option to verify only by tyoing directly in cmd as follows
sfc /VERIFYONLY
This verifies the files and reports any corrupt files.

>> Other option is sfc /SCANNOW which will verify and then repair the corrupt files.

>> For replacing any file you will be asked to insert the Windows CD/DVD and sfc will continue its work. Progress bar will show the work being done.

That's it your systems files will be restored to original.

This will also work with earlier versions of windows. Like for fixing system files in Windows Xp and more.

Autometically backup your Harddrive

Hey folks, I am back with a new solution. Imagine your selves in a situation where your Hard drive crashes and you do not have any backup. It seems a nightmare you come across. But don't worry when Faizu Baba is here to solve your problems.
You just need to install and configure a software called "Syncback" and it will do all the work for you automatically. It encompasses following benefits

Benefits:

1. It’s free and pretty easy to use.
2. You can choose to save them to an external hard drive or upload them to an FTP server.
3. Schedule nightly, weekly, and monthly backups so you don’t have to lift a finger.

Requirement:

1. A Windows PC.
2. An external hard drive. I've had great luck with a LaCie drive, the most reliable. When choosing size, go for 4-5 times the amount of data you want to back up(i.e., 4 times the size of your My Documents folder.)
3. An FTP server. This is optional, but if you want off-site backup, it's a must. See previous post, Ask Lifehacker Readers: Web hosting provider?, for recommendations on companies that provide not only web hosting, but FTP-able disk space.

Here's how to get your backups up and running.

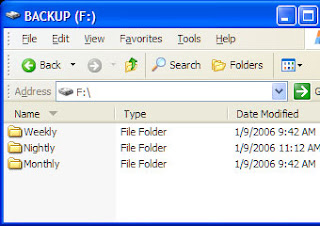
1. Set up your hardware and software. Download and install the most excellent free software, SyncBack Freeware v3.2.9. SyncBackSE version 4.0 is also available to buy at $25. This tutorial will use v.3 for the cheapies and those of you giving SyncBack a try for the first time. Once your external drive is connected to your computer and turned on, name it "Backup" and browse to it in Explorer. (On my computer, it's the F:/ drive.) Create 3 folders named "Nightly," "Weekly" and "Monthly" We're going to store our backups into these folders.


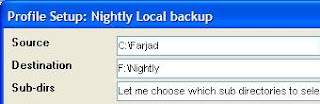
2. Create the backup profile. Fire up SyncBack. Create a new profile called "Nightly Local Backup." Set the source folder to your documents folder, and the destination to your backup drive's "Nightly" folder, like this:


3. Select the directories to backup. You can backup the entire "My Documents" folder, but I didn't want to do that, because I've got about 75 gigabytes of music, photos and video that don't change too much and aren't world-ending in subdirectories of "My Documents." I don't have the space on my drive to keep copies of multi-gigabyte media in triplicate. So I chose the backup "selected subdirectories" option, which lets me tell SyncBack to ignore "My Music," "My Pictures," and "My Video" each night when it runs. To do so, click on the "Subdirectories" tab. If you've got tons of subdirectories, it'll take SyncBack sometime to traverse the tree and show 'em to you. Go grab a drink of water and come back to check off the directories you want backed up each night.

4. Set up e-mail notification of backup failure. Since we're a bunch of smart cookies, enable the advanced options in SyncBack by hitting the "Expert" button at the bottom. To keep tabs on whether or not your nightly backup is completing successfully, in the E-mail tab, check off "E-mail the log file when the profile is done." I don't want an e-mail every day; I just want one if things go awry. So also check off "Only e-mail the log if an error occurs." Set your SMTP server options as well and hit the "Test E-mail Settings" button to make sure you can receive messages.

5. Schedule the job. Now hit up the "Misc" tab, and hit the Schedule button. Here you'll tell Windows to run this Nightly backup profile, well, nightly. I set mine to run at 2:00AM every night. Be sure to set your Windows password for this scheduled task by hitting the "Set Password" button.

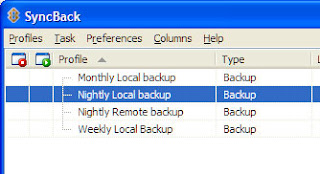
Wash, rinse and repeat twice for Weekly Local Backup and Monthly Local Backup profiles, but point them at the appropriate directories and also set the schedule to, um, weekly and monthly, respectively. Once you're all set up, you can run each job as a test (it'll take a long time, depending on how much data you've got), or just leave things to run on their own. Once all 3 profiles have run, you'll have 3 copies of your most important data on your external drive getting updated every night, week and month. If something goes wrong and the backups fail, you get an email notification letting you know.

Note
if you make bad changes the last day of the week AND month, those changes will replicate to your backups and you can lose data. One way to avoid that is to schedule bi-monthly (every other month) backup as well.

Now, our backup plan doesn't stop there. If your computer's hard drive buys the farm, you're covered, but what if your house burns down or gets burglarized? You want your most important data somewhere OFF site as well. This is where your FTP server comes in. Create a last SyncBack profile called "Nightly Remote Backup" that sends all your important data over the wire from, say, your hard drive in New York to your FTP server in Atlanta. If you don't like the idea of your data on someone else's server, check out the compression tab: you can have your files zipped up and passworded before they get FTP'ed for a little extra security.


That's it! Once your automated backup system is up and running you can rest easy knowing that if Something Bad happens, chances are your data will be safe.

Mobile Projector


If you’re looking to share some of the video or photos stored on your mobile phone with an audience then the KDDI pico projector could be just the thing for you. Designed to work with the new KDDI iida G9 mobile phone and the upcoming iidda range, the Toshiba manufactured handset uses DLP display technology. It can project a 480x320 image of between six and 63 inches onto a flat surface or wall up to 8.2 feet (2.5m) away.

While the pico projector’s built-in 0.5W speaker won’t exactly leave your ears bleeding, it should be sufficient to handle small office presentations or home movies. The battery provides for up to 130 minutes of continuous viewing and can be fully charged in less than two hours. The projector accepts 3.5mm 4-pole and VGA input, making it compatible with the Cyber-shot S001, CA001, Wooo Keitai H001 and the Exilim Keitai W63CA, W63H, W62CA and W62H.

While the pico projector is not for lounge viewing, it's handy showing off holiday video and snaps, or similar occasions, stored on the phone – as long as your friends or work colleagues are prepared to stay awake.

The KDDI pico projector measures 50×112×18.3mm and weighs 128g. A limit of 3000 projectors will be released in Japan, with each costing about 39,600 yen (about USD$415) or, if you buy the iida G9 cell phone, just 19,800 yen (about USD$205).